MID-CENTURY BEDHEAD WITH SHELVES
Alun Machin
Aesthetics plus function combine to make a great piece of furniture, and I’ve designed this timber bedhead to tuck into a small room. Using Tasmanian oak keeps it light and the side shelves make it useful.

BEFORE
I’d already made the platform bed using plywood and hairpin legs and designed the little wall-mounted side shelves. But while my furniture functions nicely, the room feels unfinished.
To build this mid-century style bedhead I’ve used a Porta timber moulding in Tasmanian oak and assembled with Bondcrete adhesive, which dries fast but gives you time to line things up. Finishing with Monocel Stain & Varnish in Clear Satin enhances the lovely woodgrain while adding a protective finish.

It helps if you have access to basic power tools and a solid surface, but if you can’t use a full workshop, stay tuned for my tips on alternative techniques.

This project is designed for a Queen-size bed and to sit on the edge of my exisiting platform bed. Measure your bedroom space and adjust the height of the bedhead and legs to suit the style and dimensions of the bed. You could also attach it to the wall.

CUTTING LIST
25mm plywood cut to 2350 x 600mm for the backing board
2 pieces of 25mm plywood cut to 300 x 250mm for the shelves
4 x 2.4m lengths of 30 x 18mm Porta Rectangle in Tasmanian oak for the framing
17 x 2.4m lengths of 35mm-wide Porta Ribbed Edging in Tasmanian oak for the cladding, trimmed to 2350mm long
2 x 2.4m of 64mm-wide pine for the legs and packers

MATERIALS
Bondall Bondcrete adhesive for assembly
painter’s tape for labelling
40mm timber screws to attach the legs and shelves
timber filler in a colour to match Tasmanian oak
Monocel Stain & Varnish in Clear to finish

DIY TOOLS
combination square to mark up angles
spirit level to check shelves
dropsaw or handsaw with mitre box
clamps, the longer the better
120 and 240-grit abrasive paper with a sanding block
nail gun with air compressor and small brads, or use 25mm nails and hammer
drill with drill bits
mini roller with microfibre cover and a tray
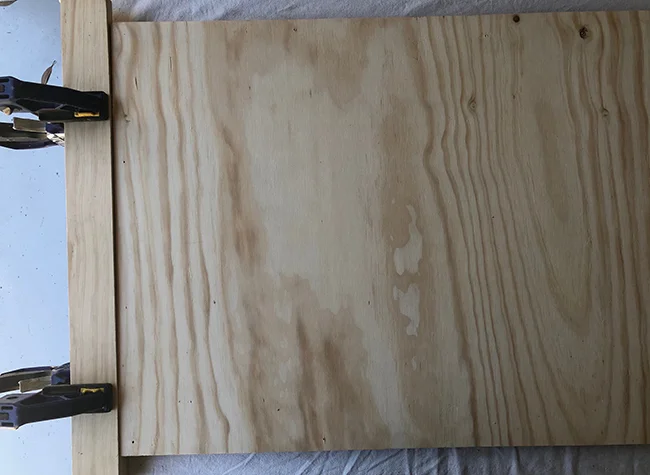
STEP 1 Set out the backing board
Position the 25mm backing board on a solid surface, with one end pushed against a straightedge, such as clamped offcut or a wall, making sure it’s high enough to keep the cladding straight.
TIP Plywood comes in standard 2400 x 1200mm sheets and 25mm-thick is heavy, so have it cut lengthways at the hardware store or timber yard with one end trimmed to make it 2350mm long.

STEP 2 Frame the shelves
To make the frames, cut one end of the framing at 45o using dropsaw or handsaw with mitre box, then measure it against the front of the plywood from the inside angle, marking the other inside corner with a combination square and cutting. Then cut each side, measuring from inside the angle against the plywood.
TIP Always cut the long side first, just in case you mess it up and have to cut it down to use for the short sides.

STEP 3 Finish the shelves
Position the frame to ensure the mitres are a tight fit, apply Bondcrete adhesive around the edges and clamp to dry. Use 120-grit abrasive paper with a sanding block to round over the corners and along the edges then smooth all over with 240-grit.
TIP The sharp edge where two sides meet is called an arris. Removing it by rounding-over the edge gives a hand-crafted finish while preventing splinters. Practice on offcuts to work out your style and keep it consistent for the bedhead frame. I like to make my corners quite rounded.

STEP 4 Attach the cladding
Begin from the base to adhere the cladding with Bondcrete, pushing the strips together to minimise gaps. Start at the base and, at the seventh strip, mark it with tape and position it without adhesive, then continue with the rest. Use a nail gun to pin the about every 600mm, but don’t pin the seventh strip.
TIP Before you start make, sure the strips are 2350mm long, the same length as the backing. And don’t apply adhesive to the seventh strip as you’ll need to remove it for the shelves.

STEP 5 Set out the shelves
Working on the seventh strip, mark the width of the shelves then use a handsaw to cut down and along the bottom ridge. Check the shelf fits, apply Bondcrete and tap the strip down then use a nail gun or nails to secure.
TIP The ridge of the strip runs under the shelf for a neat fit. I used a Japanese handsaw for this but you can use a regular handsaw too. If the shelf doesn’t quite fit, use 180-grit abrasive paper to make the ridge slimmer.

STEP 6 Attach the legs and packers
Cut the legs to the height of the backing plus the height you need the bedhead, from the floor to the base of the bedhead. Attach to the backing 500mm from the ends, using Bondcrete and six 40mm timber screws each leg. From the offcuts, cut packers about 400mm long, and attach with screws.
TIP The packers allow for the skirting board to the bedhead sits straight. I added two pieces in the middle for extra support.

STEP 7 Secure the shelves
Position and mark around the shelves then drill five pilot holes from the front (so you know where to secure screws from the back). Apply Bondcrete and clamp the shelves, using a spirit level to check they’re straight. When they’re dry, turn the bedhead over to secure with screws from the back.
TIP Have some helping hands to flip it over, angling the bedhead so the shelves are off the table. I used batten screws but the 40mm timber screws are fine too.

STEP 8 Make the frame
Using the same framing technique as the shelves, cut the mitres for the top first, then the sides and base. Working on one piece at a time, apply Bondcrete then position it at the same height as the cladding and use long clamps or a second pair of hands to hold it while you secure it with a nail gun every 200mm.
TIP I experimented with positioning the framing against the ridges at different heights but keeping it the same as the cladding minimises the shadows while concealing the backing.

STEP 9 Fill the holes and sand
Use timber filler to hide the nails, leaving it to dry. Sand the frame with 180-grit abrasive paper, rounding over the edges and corners to match the profile of the shelves. Use 240-grit abrasive paper to smooth along the cladding and over the frame, then brush away the dust.
TIP Avoid sanding the top of the ridges when using the 180-grit to round-over the frame. I used a hairdryer to blow all the dust away then wiped along the strips with a clean cloth.
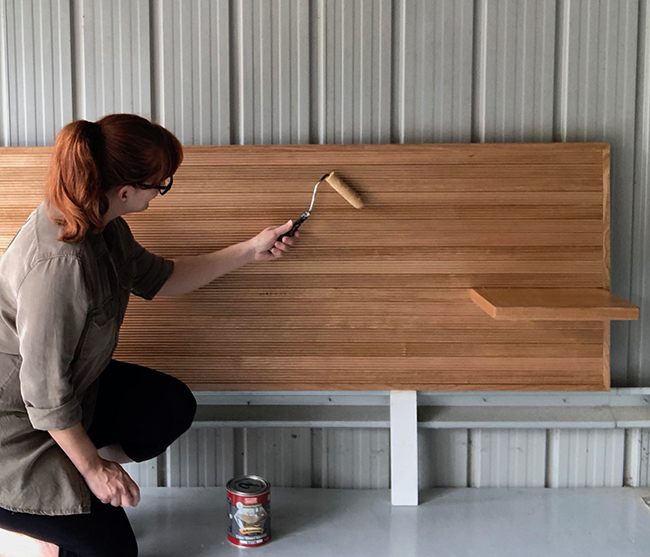
STEP 10 Seal the bedhead
Use a microfibre mini roller with a mini tray to apply one coat of Monocel Stain & Varnish in Clear and leave to dry thoroughly. Gently wipe over the surface with 240-grit, making sure to go with the grain, use a clean cloth to remove dust then apply a second coat and leave to dry.
TIP Always use a microfibre cover for the roller and, between coasts, seal it with plastic wrap to prevent it drying out.

STEP 11 Install the bedhead
Move the bedhead into place, positioning it flush against the wall and pushing the bed against it to wedge firmly.
TIP You could add brackets to attach the bedhead to the bed or D clips to secure it to the wall. I simply wiggled some rubber matting down behind packers to avoid marking the wall.

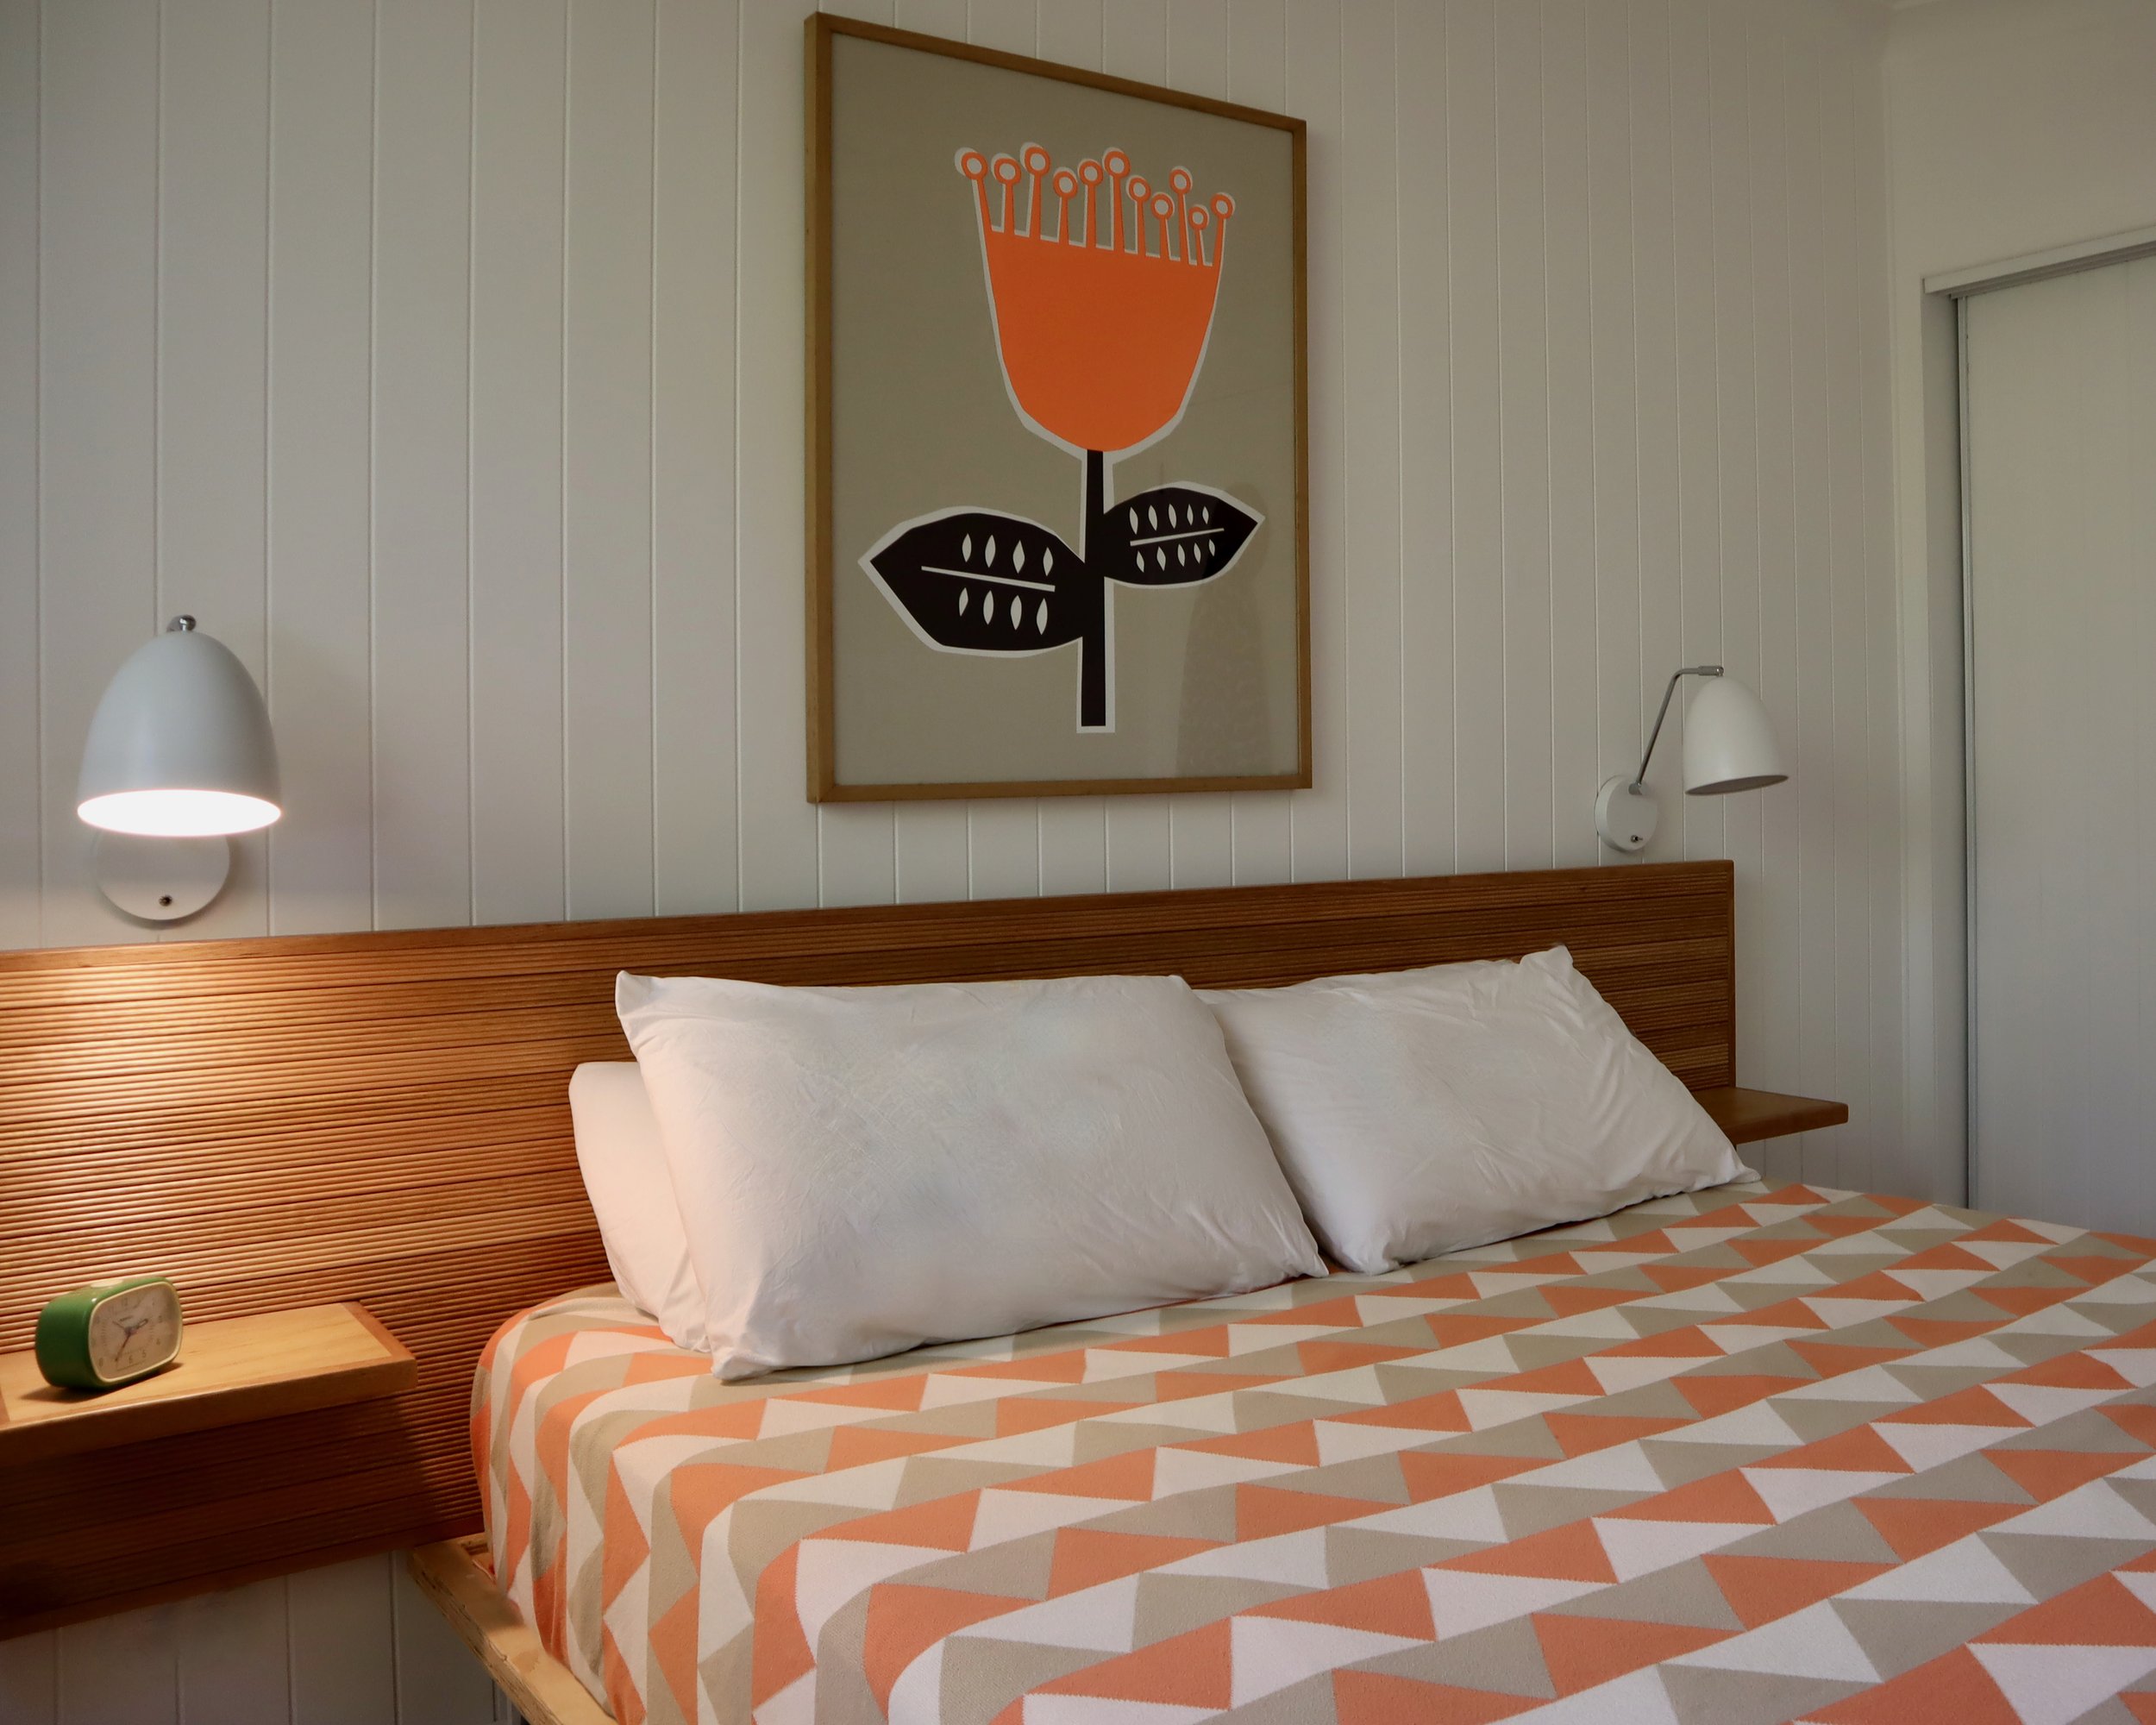
THE END RESULT
I’m inspired by mid-century design and matched the retro hairpins of the bed with the low profile and elongated lines of the bedhead. Rather than tradition teak, the Tasmanian oak adds an Australian twist while keeping the finish light.

OOOPS! You really should call on a second pair of hands to turn the bedhead and move it, to avoid doing this, which happened when I was working solo! By the way, nothing broke and the bedhead was fine.