Rattan Cabinet Revamp
Alun Machin

There are many pieces of furniture that have handy DIYers stumped as to how to make them fit into a modern home. So what’s the trick?
It takes just three simple steps to transform ordinary furniture into a piece that you’re proud of.

BEFORE I bought this 1990s cabinet of rattan boxes on Gumtree for $45, and while there’s nothing wrong it, there’s nothing about it that catches the eye to make it interesting.

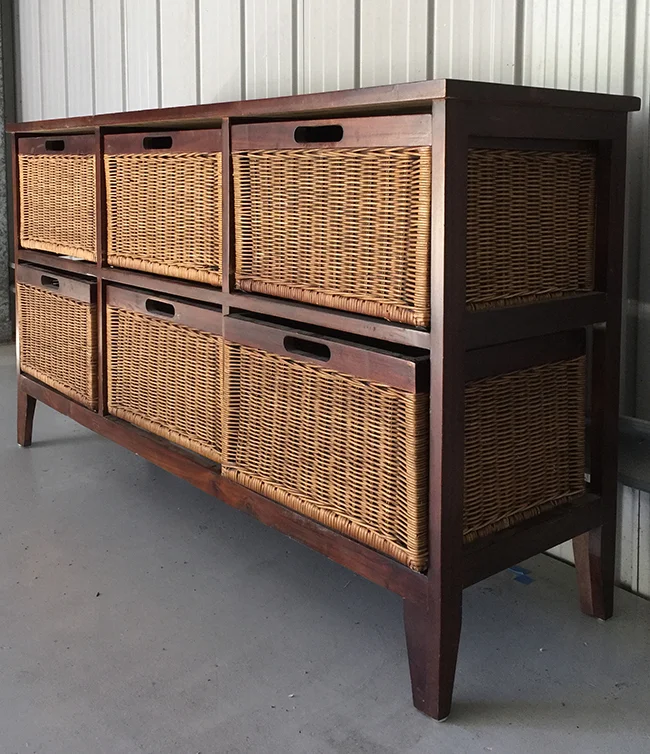
AFTER I have an easy three-step rule that works for any makeover.
Change the one thing that’s most dated. In this case, the rattan is beyond cleaning so I’m going to paint it, dust and all, and add a shiny lacquered finish.
Add an element to make it more modern. Attaching metal midcentury-style legs changes the footprint, making it appear more lightweight.
Improve the experience. Sanding back the dark timber means I can finish it with a lovely oil to highlight the woodgrain, making it feel textured and handcrafted.

DIY TOOLS & MATERIALS
sander and sanding block with 80, 180 and 240-grit abrasive paper
painter’s tape
white paint (wall or ceiling paint, or any acrylic paint)
paintbrush
mini paint roller, with two covers
clean cloth
handsaw
hammer
timber offcuts for the base
screws to attach the timber and legs
hairpin legs from Modcraft Australia

STEP 1 Clean up the boxes
Remove the varnish from the timber section of boxes by sanding with 80 then 180-grit abrasive paper, rounding over the edges slightly to remove any dents.
TIP It doesn’t compromise the end result by sanding only the outside timber, so you can paint the entire inside white.

STEP 2 Protect the raw timber
Use painter’s tape to mask around the top of the boxes, leaving it on while painting and applying the varnish.

STEP 3 Paint the boxes
Use a roller and brush to paint the boxes inside and out, rolling and brushing from different angles to saturate the rattan. A light coat is enough to freshen up the insides, but apply two on the outside and an extra third coat on the fronts.
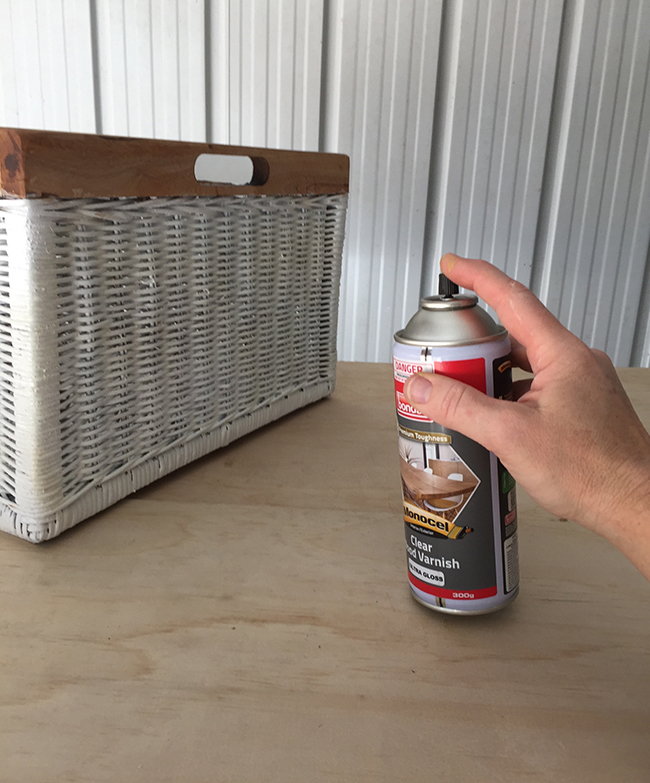
STEP 4 Add a glossy finish
Use Monocel Clear Wood Varnish spray in Ultra Gloss to coat the outside of the boxes for a modern, shiny finish that compliments the glossy hairpin legs. Hold the can 250mm from the surface to lightly spray a couple of coats, leaving to dry between each.

STEP 5 Finish the boxes
Use a cloth to apply Monocel Bench Top Oil around the top of the boxes, applying liberally then wiping away excess.
TIP The oil soaks into raw timber, enhancing the timber grain and giving a beautiful matt finish.

STEP 6 Remove the legs
Mark out the best position to cut the legs, making sure the cabinet remains structurally solid. Cut the legs using an electric or handsaw, removing remaining nails with a claw hammer.
TIP I like using a little Japanese handsaw as it cuts with a pulling motion, which is more natural cutting action and opposite to Western saws.

STEP 7 Add a base for the legs
If your cabinet needs a base for the hairpin legs, add timber either side, making sure it fits in with the base of the cabinet.
TIP Countersink the screws to ensure they’re below the surface so the hairpin plates sit flush.

STEP 8 Remove the old varnish
Clean up the frame by removing varnish using an electric sander if you have one. Begin with 80 grit abrasive paper, then tidy up with 180, and finish the top with 240.
TIP Use a hand-sanding block to remove dents and smooth over the edges and corners to round them over. This softens the profile of the cabinet and compliments the more natural timber finish.

STEP 9 Finish the frame
Apply Monocel Bench Top Oil using a roller, starting at the top, working around the edges and down the frame, covering all raw timber, even if it’s not visible later. Then begin along the top to wipe away any excess and leave to dry thoroughly.

STEP 10 Attach the legs
Turn the cabinet upside down on a clean mat to attach the hairpin legs, making sure the screws are short enough not to protrude through the base.
TIP Position the legs so the back of the cabinet can be pushed against a wall.
BEFORE This is a nice-enough piece of furniture but there’s nothing visually enticing or special about it.

AFTER While the lovely legs and the new white finish makes this a modern piece, it’s the lovely natural timber that is the star of the show!
Did you know? There's a LOT of rattan furniture out there and this project has inspired the many DIYers of Houzz Australia and Houzz France.