DIY outdoor shower (with hot water!)
Alun Machin
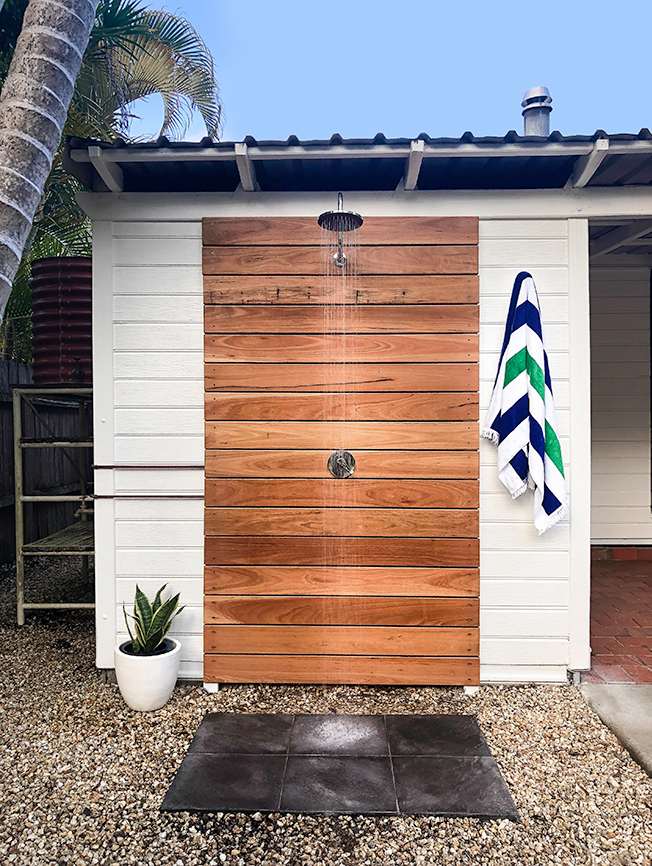
The Aussie backyard isn’t complete without an outdoor shower, and hooking it up for hot water is the ultimate in alfresco luxury.
Use Australian hardwood and an easy-to-use waterproofing system to create a resort-style retreat, just like the one I installed along the exterior wall of my laundry.
Waterproofing the house wall, building the timber splashback and laying the pavers are straight-forward DIY projects, although you need a plumber to hook up the shower up for hot water.

I checked the requirements with the plumber when he stopped by to give a quote and, in this instance, it’s enough to have pavers that wash off onto the surrounding pebbles and sandy soil underneath.
Make sure you choose a spot against the house that has good drainage and where pooling water won’t cause moisture damage.

BEFORE Behind the location of my new outdoor shower is the laundry, which is also being renovated. Knocking out the window and waterproofing the entire wall provides the perfect spot for a shower.
The window cavity was sealed with FC sheeting cut to fit and both sides sealed by brushing on Gripset Betta Bitumen Rubber. The exterior wall was then waterproofed and painted to match the rest of the house.
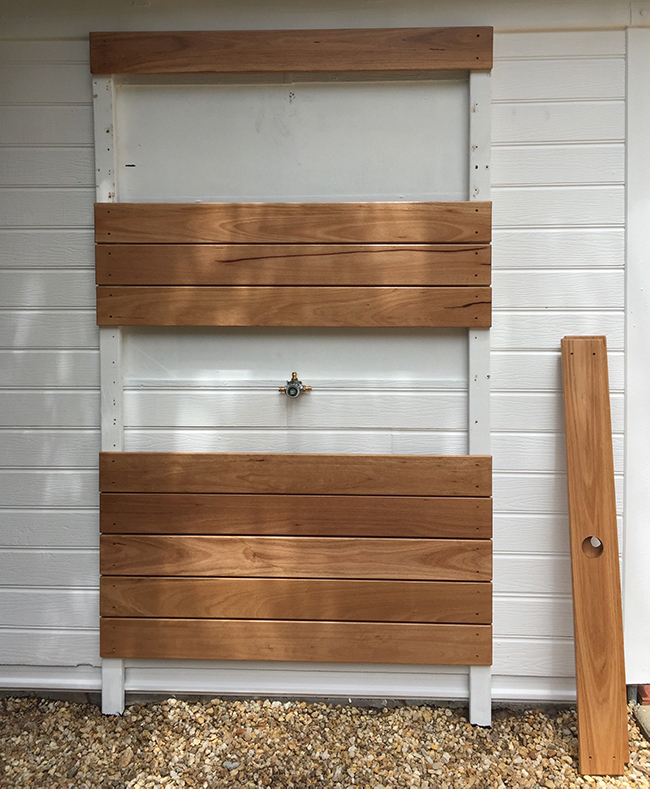
The splashback consists of two treated pine rails, positioned in-ground then attached to the wall. The 135mm-wide hardwood decking boards are cut and secured directly onto the frame with stainless steel screws.
To get the timing right, install the splashback first, but be prepared to remove some of the boards for plumbing access.
Lay and seal the pavers after the shower is done to ensure they’re in the best spot for standing under the shower and they also need time to cure.

There are differing opinions about choosing outdoor tapware, which is expensive and difficult to source. My research resulted in deciding to go with a regular chrome shower rose, arm and mixer. They'll eventually lose their shine but will continue to function efficiently.

To work out your budget, this project cost about $1400, including $400 for the plumber, $250 for the tapware, about $250 for the hardwood, $100 for paving and the rest in hardware and timber such as treated pine and stainless steel screws.
See my post for the easiest step-by-step instructions on how to lay paving for the shower.
DIY MATERIALS
paint to match the wall with equipment including brushes
two 2.4m lengths of 70 x 35mm treated pine
about 21m of 135 x 19mm hardwood decking (I cut 15 boards to 1350mm long)
75mm galvanised batten screws
50mm stainless steel decking screws
microfibre mini roller and tray
shower head, arm and mixer
DIY TOOLS
measuring tape and spirit level
compound sliding mitre saw
impact driver
drill with 10mm countersinking bit
random orbital sander and hand-sanding block with 120 and 180 grit abrasive paper

1 Measure up
Use a mitre saw to cut two posts from treated pine to fit against your wall, mine were about 2.2m tall, adding an extra 100mm for setting them into the ground. Locate the studs behind your wall and position the posts over the wall studs.

2 Cut the boards
Measure the distance between the outside edges of the posts so the decking boards sit flush then cut the boards to length with the mitre saw.

3 Waterproof the wall
Remove the posts and, on the wall of the house, apply two coats of Gripset Betta Weather Seal using a roller, leaving to dry between coats, then apply two coats of house paint.


4 Seal the posts
Seal the bottom 100mm of the treated pine posts with Bondall In-Ground Timber Protector, leaving to dry between coats then paint all over with house paint.

5 Attach the rails
Using an impact driver, secure the posts to the wall studs with 75mm batten screws and apply a second coat of house paint.
TIP Using an impact driver instead of a regular drill means the screws go straight in, rather than having to drill pilot holes first.

6 Prepare the boards
On the ends of the hardwood boards, measure and mark 50mm and 30mm from the top and bottom edges to countersink two holes using a #10 countersinking bit.

7 Sand the boards
Sand the boards with 120-grit abrasive paper, rounding over the ends and corners, finishing with 180-grit over the front and sides.

8 Seal the boards
To make the splashback weatherproof, apply Monocel Gold Clear Varnish in Satin, leave to dry and sand lightly with 180-grit abrasive paper then repeat for a second and third coat of varnish.
TIP Set out the boards so you can coat one face and one edge, leave to dry then turn them to complete the remaining surfaces.

9 Install the splashback
Attach the boards to the posts using an impact driver and 50mm stainless steel decking screws through the countersunk holes. Begin with the lowest board about 150mm from the ground, using a spirit level to check that it’s straight. Install the remainder of the boards, working upwards and using spacers as you go.

10 Fit the tapware
Remove some of the boards to allow the plumber access to fit the shower, mixer and copper pipes. Use a spade bit to drill holes for the pipe through the side of the posts, making sure the pipes will sit level from the tap. The plumber can drill holes in the centre of two boards for the shower and mixer while they install the fittings.
TIP Building the splashback first means the tapware can be centred and pipes hidden behind the boards.

To finish the outdoor shower, install a stable, hard surface to stand on while using the shower. See my post for the easiest step-by-step instructions on how to lay paving for the shower.