Build a banquette with fluted timber detail
Natasha Dickins
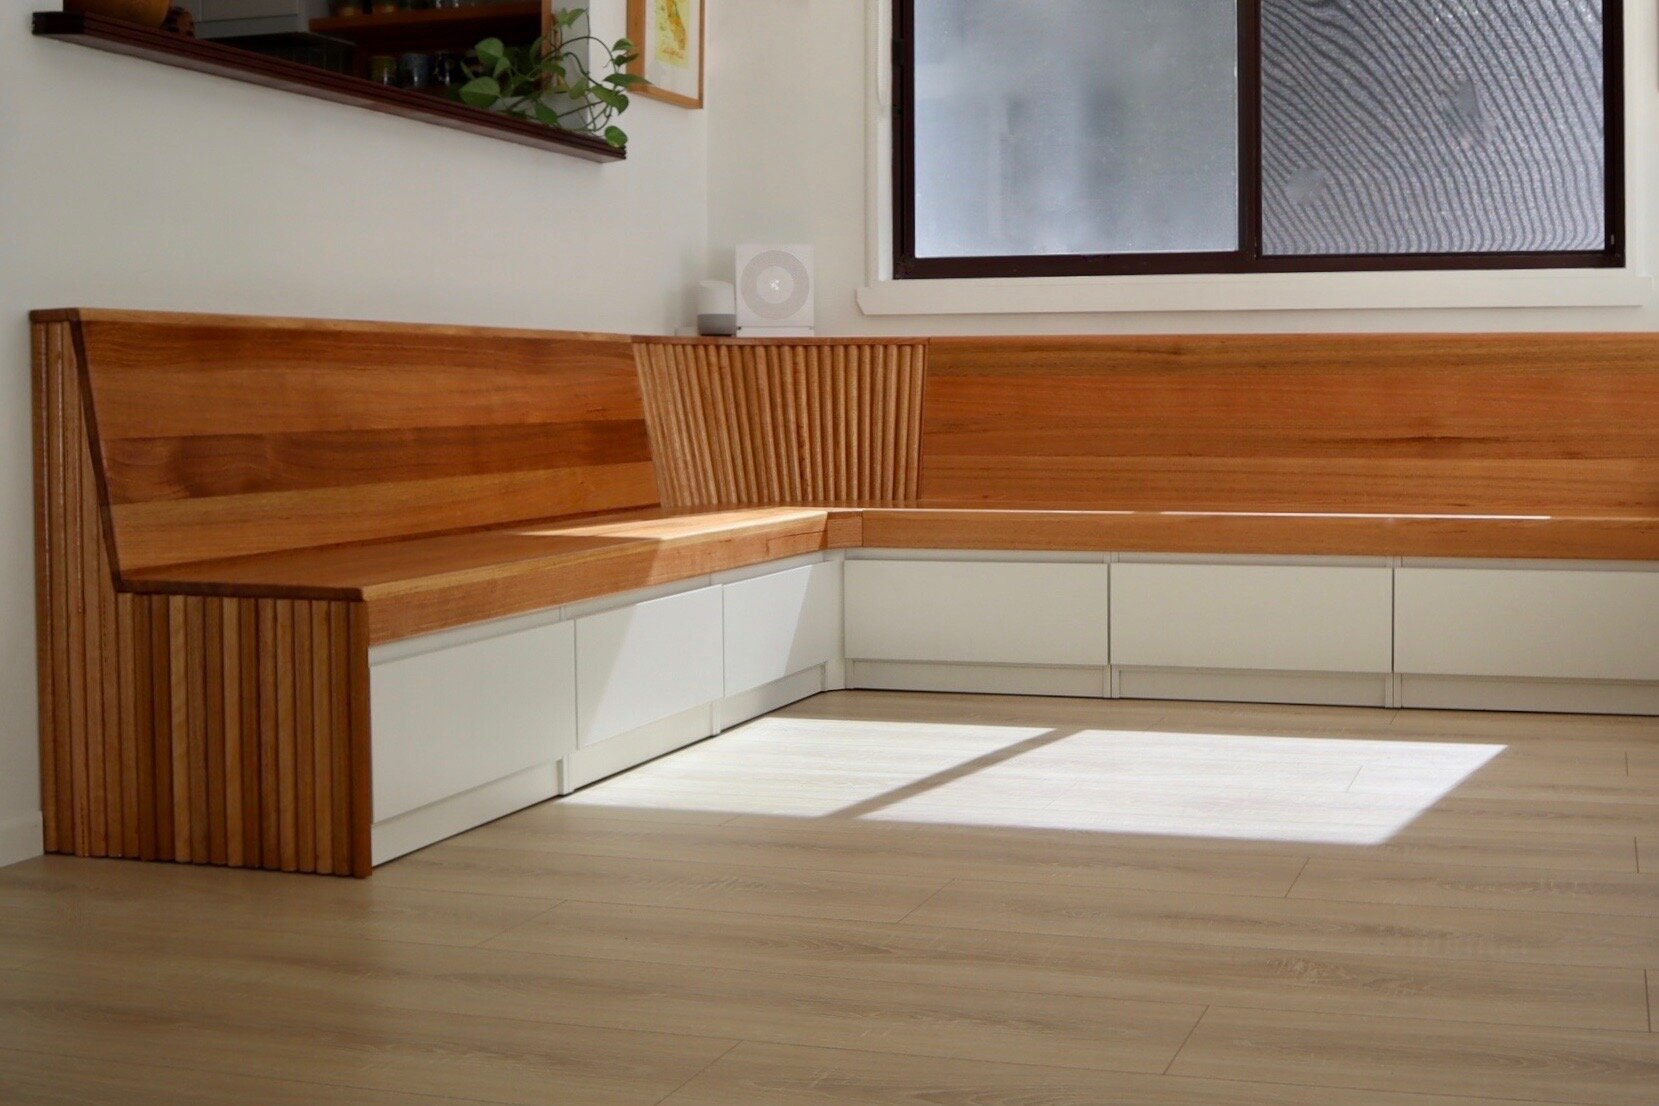
Sitting in a booth or banquette makes you feel part of something special. It has a cosy, comfy, casual vibe, and that’s what I wanted for this dining area.
In creating the built-in seating I’ve also added storage for tablecloths, board games, cookbooks and shopping bags, while hiding the phone line, modem and switches in the corner of the room.
“A banquette is ‘an upholstered bench along a wall’, ‘a dining bench that seats multiple people’ or ‘a freestanding or built-in breakfast nook’. It’s also a ‘booth’. Whatever it’s called, it’s not that difficult to build!”

PHOTOGRAPHY Cath Muscat STYLING Matilda Roberts
I recently renovated my kitchen that faces out to the dining area. To help the rooms feel more cohesive I used Tasmanian oak in both, with the same woodworking techniques to round over the edges and corners, sealing it in clear marine-grade Monocel Gold varnish for a smooth, durable finish.
TIP Read more about ‘How to personalise your kitchen design’ in a story I did with Bunnings.

The banquette design is influenced by standard measurements of the materials used to keep the build as simple as possible.
DRAWERS I used six white Multistore Storage single-drawer flatpack cabinets. At 608mm wide x 430mm deep x 330mm high they’re the perfect size to frame up for seating.
JOINERY I bought the Tasmanian oak panels from Bunnings, for $65 each (these are similar). They are 22mm-thick, 1800mm-long x 405mm-wide and I used two panels for seats, two for backrests, one to cut down for the aprons and shelves, one to laminate for the corner shelf and drop-in seat, and one for the box shelf.
THE CORNER To cover the gap between the cabinets, there’s a curved drop-in seat that lifts out for access to the phone line and switches. The bevelled shelf above it has a cable duct to hide cords for the modem. It also provides the top brace for the fluted timber detail.
FLUTED TIMBER DETAIL The corner is clad in Porta 30mm-wide Tasmanian oak half-round dowel, creating an elegant curve to match the slope of the backrests. It’s repeated at the end of the banquette to cover the cabinet.
FILL-IN BOX SHELF I left the gap between the banquette and wall until the end, building a simple box to drop in as an extra shelf.
THE RESULT The shelf running along the backrests is 800mm up from the floor. The finished seat is 410mm high, and I’m planning to add 75mm-thick upholstered sofa-style cushions.

There was a lot of sketching around working out how the backrest would sit against the seat and how to frame the fluted detail. I also wanted to minimise white painted pieces, using just one piece in the corner between the cabinets and another as a kick-board for the box shelf.
TIP I also worked out how to keep the skirting boards, having them run into the fluted detail at the end of the banquette.

Making a template helped me move from planning to building. I used it to work out the angle of the backrests, how far from the wall the cabinets should be, and the shelf depth along the top. I also used it to mark out the framing.
TIP The backrests are angled at 10°, which is comfortable to sit against, but also an easy setting on most saws. Anything in this build that slopes, including the fluted detail in the corner, has a bevelled edge of 10°.

After removing the drawers, I joined the cabinets, drilling through with 30mm screws. The units are much lighter to move around without the drawers.
TIP The cabinet sides are 15mm thick so don’t over-screw, or use 25mm screws to avoid protruding through the other side.

The cabinets aren’t designed to take heavy weight, so I’ve reinforced them with a frame built of 35mm x 70mm treated pine. Framing is secured to wall studs with 50mm batten bugle-head screws and positioned over the joins so they’re supported by the sides of the cabinets. I ran framing around the wall for the backrests, packing it out in sections for extra support.
TIP Use a stud finder to locate the wall studs and mark them with tape. When setting out the framing, check the cabinets are totally supported and won’t move.

To minimise dust and noise, I moved the woodworking outside, setting up the panels on sawhorses and cutting them with a track saw angled at 10°. I cut up one panel for the 70mm-wide aprons and 90mm-wide shelves with a bevelled edge.
TIP The bevelled edges help the backrests sit neatly against the seats, and the front of the shelf compliments the angle.

To secure the aprons under the seats, I predrilled holes with a 10G combination countersinking bit, securing with adhesive and screws, clamping to dry. I did the same to secure the shelves to the backrests.
TIP Bondall’s Bondcrete is my go-to adhesive as it provides a strong bond, dries clear and fairly quickly, and is easy to sand. I also have an army of Irwin quick-grip clamps with swivel jaws that flex for even pressure over angled joints.

For the corner, I made a box from framing, securing it to the cabinets and into wall studs. To create a curved brace for the dowel, I made a template from scrap plywood, using it to cut a top and base from 15mm plywood, bevelling the edges with a jigsaw set at 10°. The base brace is positioned in line with the back of the seats, the top brace is attached under the corner shelf.
TIP The framing here also supports the corner seat, which lifts out for access to electricals.

I joined two panel pieces side-by-side to create the 650mm-square of timber needed to cut the corner shelf and drop-in seat. Then I drew the curve with the template and made the bevelled cut with the jigsaw. The top brace was glued under the corner shelf, 16mm in from the edge, to allow for the dowel, which is 12mm high, and a backing of 4mm-thick flexible plywood.
TIP If you have the tools and the time it’s worth using biscuits to reinforce the panel join. I simply used adhesive and reinforced it with an offcut underneath.

To make a hole for the cable duct, I set up a drill with a 60mm holesaw and arbor, making the first half of the cut from the top, flipping the shelf to finish from underneath to avoid breakout.
TIP The 60mm cable duct is positioned in the back corner, at least 40mm from the edges to allow for the wall framing underneath.

I dry-fit the seats and backrests before sanding, using them to size the drop-in corner seat and apron. The gap between the cabinets was covered by bevelling a piece of pine and painting it white. I used a 3mm spacer to match the shadow line of the cabinets along the floor, then secured the piece to the cabinets with 15mm brads.
TIP While the joinery is in position pencil the edges to be rounded-over, including along the front of the seat and shelf. Avoid rounding any edges butting against other pieces, such as the seat against the bookshelf.

Using a random orbital sander with 180-grit abrasive disc, I round-over the edges and corners and smoothed the countersunk holes, repeating with 240-grit. Then I applied varnish with a mini mohair roller and left it to dry. Next day, I lightly sanded with 240-grit before applying a second coat.
TIP Always wipe down the surfaces with a damp cloth to remove the dust before applying varnish.

I installed the seats, backrests and corner shelf with 10G x 40mm screws through the countersunk holes, then covered them with timber filler.
TIP Because the joinery is already varnished, keep the filler neat by using a fingertip to push it into the holes and smooth the top with a scraper. Leave to dry, smooth over with 240-grit then, when varnishing the dowel later, dab over the filler with the roller to seal.

To cover the end of the banquette, I cut dowel to fit under the seat and backrest, positioning the first piece flush with the edge of the cabinet, working towards the wall. The last piece didn’t quite fit, so I sanded the edges to make it slimmer. Each piece is secured to the cabinet and framing with adhesive and 15mm brads, shot into the side of the dowel using a nail gun with an air compressor.
TIP Position thick cardboard or 4mm plywood underneath as a spacer to maintain the shadow line along the floor, and to catch any drips of adhesive.

In the corner, I fitted 4mm flexible plywood into the frame (from Mr Ply&Wood), secured with adhesive and small screws, which were removed once the adhesive had dried. I set the mitre saw to 10° and cut the dowel to length, then secured it with adhesive and brads.
TIP To minimise the gaps along the top of the starburst shape, sand the sides of the dowel, from the base up to about 150mm, then splay the pieces outwards. Position them with tape to check they fit before securing.
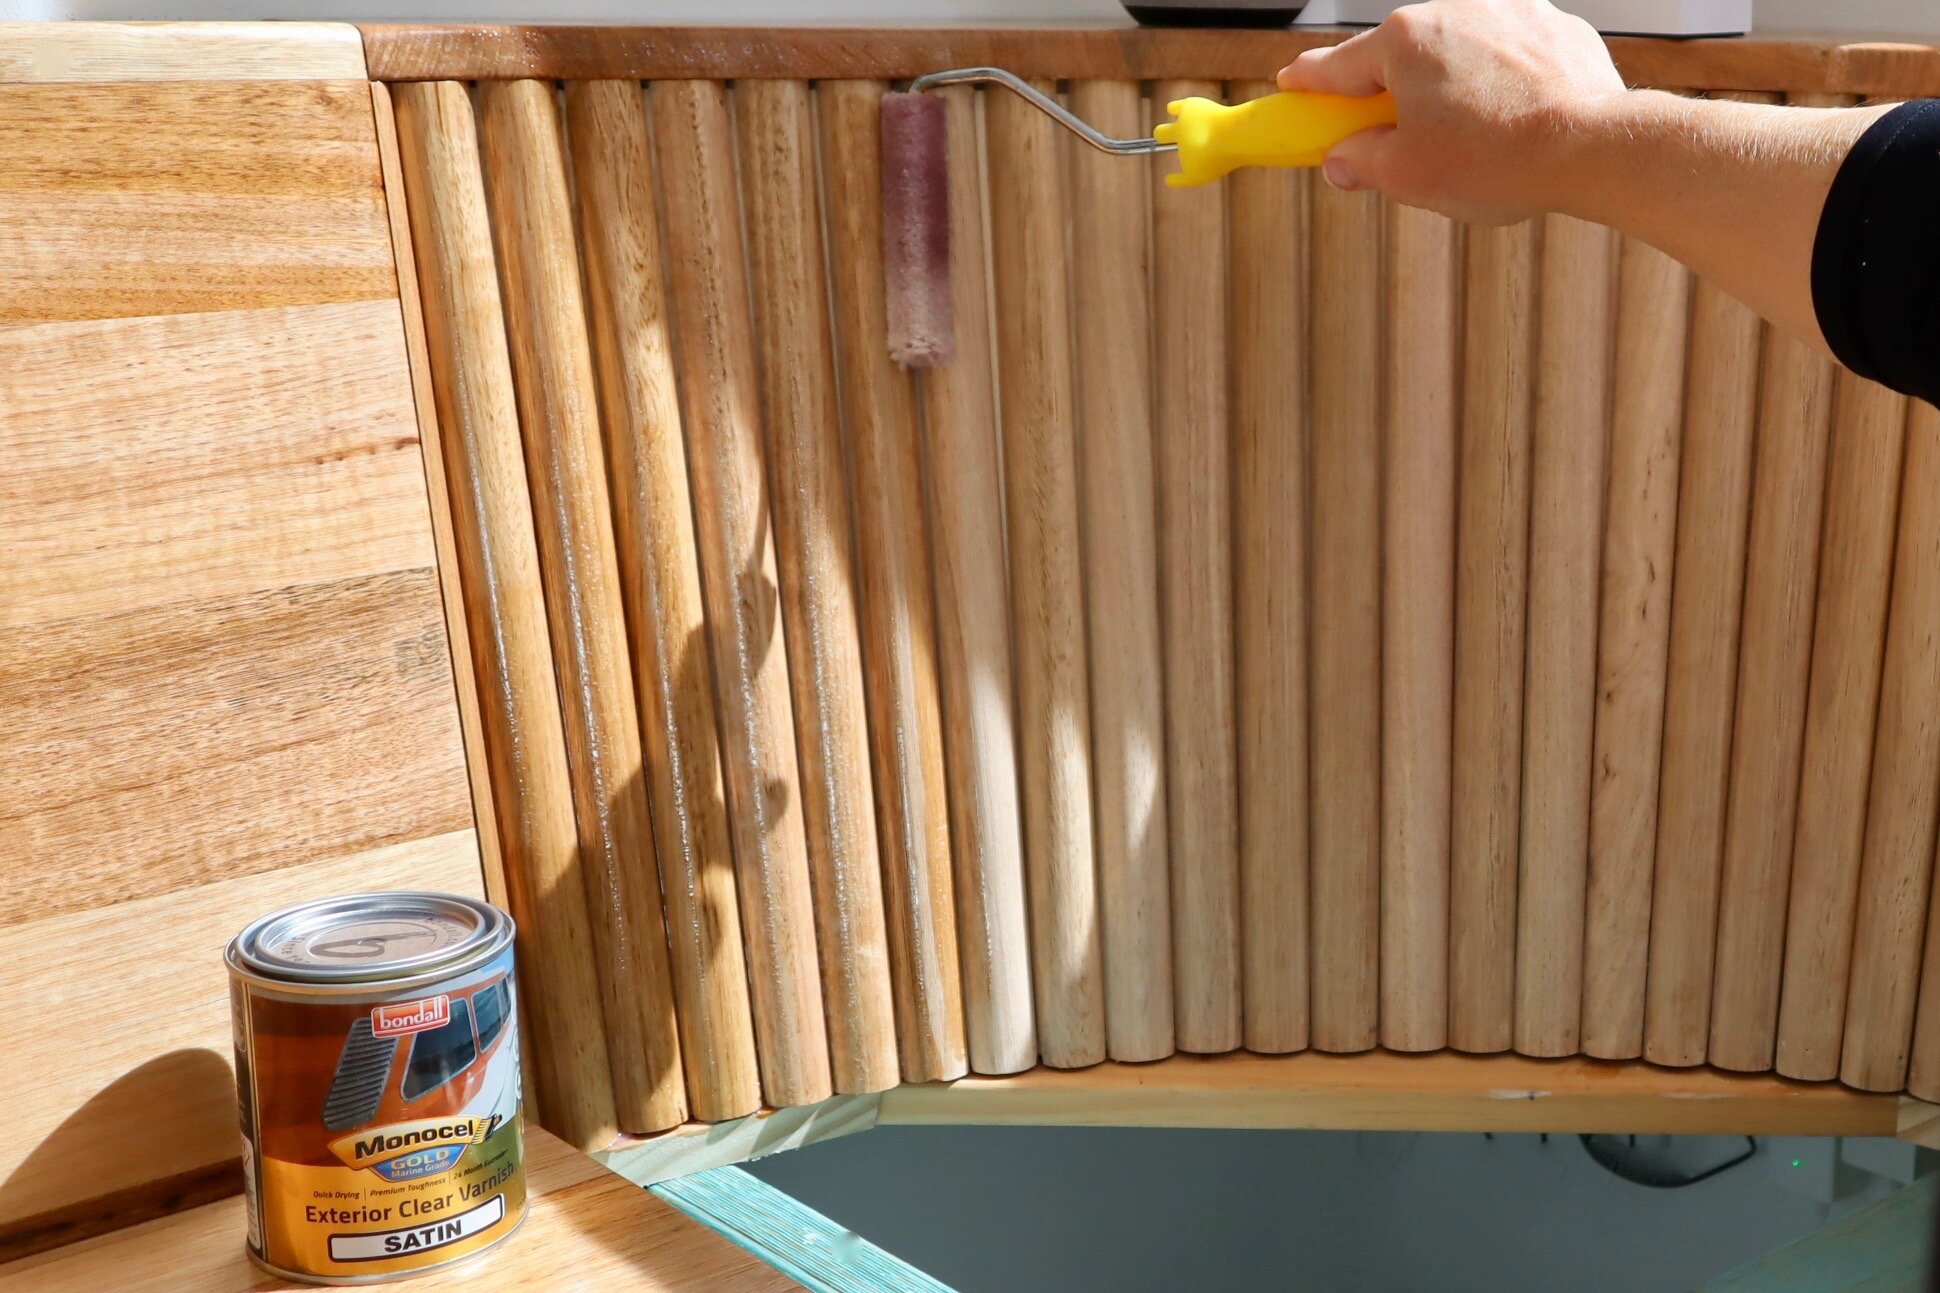
After dabbing timber filler over the brads, I sanded the dowel smooth and wiped away the dust. I applied varnish, leaving it to dry overnight, then lightly sanded with 240-grit before applying a second coat.
TIP An efficient technique is to pull the mini roller down between the dowel, then turn it to apply an even coat over the front. I’ve found mohair gives an even finish and is less likely to shed than other types of rollers.

To fill the space between the banquette and the wall, I made a box from a panel. It’s positioned on framing that matches the shadow line of the cabinets along the floor with 3mm spacers, and is covered with a kick-board of painted pine.
TIP The end of the backrest near the bow isn’t noticeable, so I skipped the fluted detail and simply cut a piece of plywood to fit, varnishing it to match the rest of the joinery.

The box was varnished, then simply slipped into the space to sit 100mm higher than the seat. It’s quite heavy so I left it unattached for the option of moving it to run an electrical cord behind for a lamp.
TIP The framing underneath is attached to the cabinet, leaving room for the skirting. The kick-board is the same height and sits flush to the skirting for a neat finish.

Will you be installing a banquette?
Tag me on your project and follow more of my DIY journey on Instagram for tool tips, home improvement and simple building projects.